We were asked to produce some complex printed retail display graphics for our client American Apparel. The finished graphics look deceptively simple hanging in the 16 store windows across the UK. On the diagram below we reveal exactly how we produced this custom retail display.
We created a multi layered 3D printed retail display design using Viscom board, acrylic and layered inks. You can download the details of how we achieved this complicated but deceptively simple effect for American Apparel’s window display here.
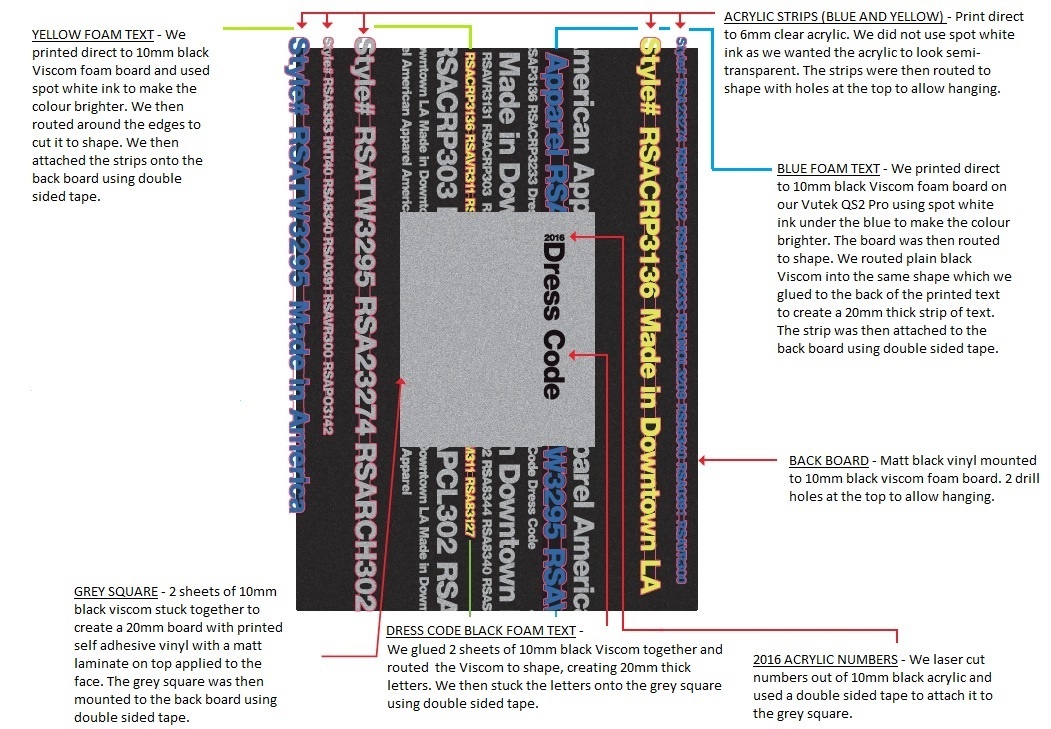
The printed retail display was made up from the following –
- Back board – We used black 10mm Viscom (foam board) as a back board. We then mounted a matt black vinyl onto each of the panels to give a high quality finish.
- Grey Square – We joined two of 10mm black Viscom (foam board) to create a 20mm thick panel. A grey patterns was printed onto self-adhesive vinyl in white and we then applied a matt laminate over the top. The vinyl was then applied onto the 20mm thick Viscom. Double sided tape was then used to attach the grey square onto the centre of the back board.
- Yellow Foam Text –We printed direct to 10mm thick Viscom foam board and used spot white ink to make the colour brighter. We then routed around the edges to cut it to shape. We then attached the strips onto the back board using double sided tape.
- Blue Foam Text –We printed direct to 10mm black viscom foam board with spot white ink to make the blue brighter. We then routed around the edges to cut it to shape. We then attached the strips onto the back board using double sided tape.
- Yellow and Blue Acrylic Strips – We printed direct to 6mm clear acrylic. We did not use white ink as we wanted the blue and yellow acrylic to look semi-transparent. These were then routed to shape with drill holes along the top to allow the strips to be hung in the window displays in front of the back boards, creating more depth to the display.
- 2016 Acrylic Numbers – We laser cut 10mm black acrylic into the shape of the numbers and then each number was glued onto the grey square to create the 2016 above the Dress Code text.